こんにちは。
本日はdartのコードを自動生成できるプラグインmasonを使ってみたいと思います。
早速インストールしてみましょう。
私の実行環境はこちら。
flutter: 3.3.5
dart: 2.18.2 (stable)
インストール
$ dart pub global activate mason_cli
+ archive 3.3.2dencies... (1.3s)
+ args 2.3.1
+ async 2.9.0
+ checked_yaml 2.0.1
+ cli_util 0.3.5
+ collection 1.17.0
+ crypto 3.0.2
+ file 6.1.4
+ http 0.13.5
+ http_parser 4.0.2
+ json_annotation 4.7.0
+ mason 0.1.0-dev.34
+ mason_api 0.1.0-dev.8
+ mason_cli 0.1.0-dev.37
+ mason_logger 0.2.1
+ meta 1.8.0
+ mustache_template 2.0.0
+ path 1.8.2
+ platform 3.1.0
+ pool 1.5.1
+ process 4.2.4
+ pub_semver 2.1.2
+ pub_updater 0.2.2
+ recase 4.1.0
+ source_span 1.9.1
+ stack_trace 1.11.0
+ string_scanner 1.1.1
+ term_glyph 1.2.1
+ typed_data 1.3.1
+ yaml 3.1.1
Downloading mason_cli 0.1.0-dev.37...
Downloading pub_updater 0.2.2...
Downloading mason_api 0.1.0-dev.8...
Downloading mason 0.1.0-dev.34...
Downloading recase 4.1.0...
Downloading mason_logger 0.2.1...
Downloading stack_trace 1.11.0...
Downloading pub_semver 2.1.2...
Downloading collection 1.17.0...
Downloading http_parser 4.0.2...
Downloading archive 3.3.2...
Building package executables... (1.3s)
Built mason_cli:mason.
Installed executable mason.
Activated mason_cli 0.1.0-dev.37.
masonコマンドを打って以下の表示が出ればインストール成功。
$ mason
🧱  mason • lay the foundation!

Usage: mason <command> [arguments]

Global options:
-h, --help       Print this usage information.
    --version    Print the current version.

Available commands:
  add        Adds a brick from a local or remote source.
  bundle     Generates a bundle from a brick template.
  cache      Interact with mason cache.
  get        Gets all bricks in the nearest mason.yaml.
  init       Initialize mason in the current directory.
  list       Lists installed bricks.
  login      Log into brickhub.dev.
  logout     Log out of brickhub.dev.
  make       Generate code using an existing brick template.
  new        Creates a new brick template.
  publish    Publish the current brick to brickhub.dev.
  remove     Removes a brick.
  search     Search published bricks on brickhub.dev.
  unbundle   Generates a brick template from a bundle.
  update     Update mason.
  upgrade    Upgrade bricks to their latest versions.

Run "mason help <command>" for more information about a command.
masonテンプレートを作成するには、テンプレートを作成したいフォルダの下でmason initを打つ。
私の場合は、新しいFlutterプロジェクトを作って、その下にmasonフォルダを新規作成しました。
参考↓

テンプレートを作成します。
テンプレートを保存しておくフォルダを作成します。
私の場合は先ほど作成したmasonフォルダの下にbricksフォルダを作りました。
作成したフォルダに移動して、mason new <テンプレート名>コマンドを打ちます。
(例)
mason new my_stateless_widget
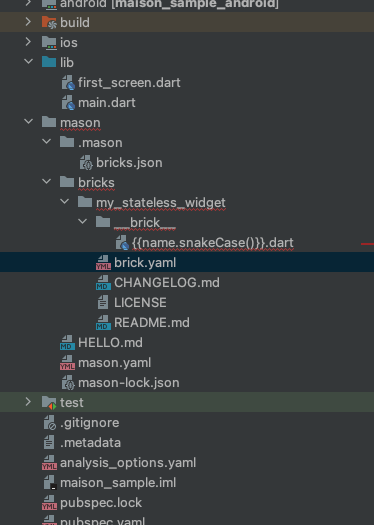
するとですね、bricksフォルダの下にmy_stateless_widgetフォルダができます。
その下には
 __brick__
brick.yaml
CHANGELOG.md
LICENSE
README.md
というフォルダとファイルができます。
__brick__というフォルダの下にテンプレートを保存します。
最初からHELLO.mdというテンプレートが入っていると思いますが、こちらは消して大丈夫です。
ここに{{name.snakeCase()}}.dartというファイルを作成し、下記のコードを保存します。
import 'package:flutter/material.dart';

class {{name.pascalCase()}} extends StatelessWidget {
  const {{name.pascalCase()}}({super.key});

  @override
  Widget build(BuildContext context) {
    return const {{child.pascalCase()}}('{{text.pascalCase()}}');
  }
}
{{}}で囲まれた箇所は引数といして自由に書き換え可能です。
brick.ymlのvars:の部分を書き換えます。
name: my_stateless_widget
description: A new brick created with the Mason CLI.

# The following defines the version and build number for your brick.
# A version number is three numbers separated by dots, like 1.2.34
# followed by an optional build number (separated by a +).
version: 0.1.0+1

# The following defines the environment for the current brick.
# It includes the version of mason that the brick requires.
environment:
  mason: ">=0.1.0-dev.26 <0.1.0"

# Variables specify dynamic values that your brick depends on.
# Zero or more variables can be specified for a given brick.
# Each variable has:
#  * a type (string, number, boolean, enum, or array)
#  * an optional short description
#  * an optional default value
#  * an optional list of default values (array only)
#  * an optional prompt phrase used when asking for the variable
#  * a list of values (enums only)
vars:
  name:
    type: string
    description: Your file name
    default: Dash
    prompt: What is your file name?
  child:
    type: string
    description: Your widget name
    default: Dash
    prompt: What is your widget name?
  text:
    type: string
    description: add text
    default:
    prompt: What is your text?
テンプレートを登録します。
mason add -g my_stateless_widget --path my_stateless_widget
-gをつけることで、現在のフォルダに関わらず、 どこでも作成したテンプレートを使用できるようになるそうです。
早速、このテンプレートを使ってStatelessWidget作成してみます。
ファイルを作成したいフォルダに移動します。
flutterのWidgetコードを作成したいので、flutterプロジェクトのlibフォルダに移動します。
$ mason make my_stateless_widget
? What is your file name? (Dash) first_screen
? What is your widget name? (Dash) text
? What is your text? hello
✓ Made brick my_stateless_widget (45ms)
✓ Generated 1 file:
できたコードはこんな感じ。
import 'package:flutter/material.dart';

class FirstScreen extends StatelessWidget {
  const FirstScreen({super.key});

  @override
  Widget build(BuildContext context) {
    return const Text('Hello');
  }
}
まとめ
- 同じような画面やUIを沢山作るのによさそう
- ある程度決まりきったUI(BottomTabWidgetとか)とか作るのによさそう
- いつもつかうimportとかを最初から入れておけるのよさそう
- アプリを沢山作る場合には使えそう
- もっと色々できそうなので調べてみたい